Showing posts with label cheese. Show all posts

Thursday, May 27, 2010

Iain & Emily's Tacos Verdes

Well, it's official. If we hadn't gone foodie before, we certainly have this time. Several weeks ago we decided to make some experimental tacos. We each focused on making about half of the components, while conferring with each other for the overall palette, and the end result was mindblowingly awesometacular. With that last sentence, I probably just gave away that it was Iain writing this paragraph.

This recipe is a little on the intensive side, but it didn't seem hard to make at the time, especially with two people working on them. It was mostly a really fun experience to make, and the combination of flavors hitting your tongue is exquisite. Think hearty yet crisp and fresh at the same time. Did your mouth start watering there? Yeah. I thought so.

Tofu Tacos Verdes

Ingredients
Salsa Verde
2 tomatillos, diced finely
1/8 cup onion, diced finely
1 clove garlic, crushed

1 tbs lime juice

shake of garlic powder

1 Serrano pepper, minced and seeded

Onions/chili mixture
The rest of the onion, cut into rings
1 ancho pepper, diced
2 cloved garlic, minced
1 Serrano pepper, minced and seeded
1 green bell pepper

Tofu de Excellence
1 half of a container firm tofu, pressed
a few glugs vegetable oil
3/4 tsp cumin powder
small handful corn meal
chili powder
more cumin
salt

Other Components
5 flour tortillas
Habanero Jack Cheese (a little), grated
Tillamuk Cheddar Cheese (a lot), grated
1/2 can frijoles negros refritos (refried black beans)
cut up cilantro

Music Listened To
Putamayo's
A Jewish Odyssey, courtesy of Emily's iPod.

Procedure

Well, I (Iain) shall begin be reporting on the parts I produced, and then I shall hand the keyboard over to Emily.

1. The salsa! After you've prepped all the above ingredients, turn to your friend, the food processor. Place 3/4 of tomatillos, the onion and the garlic in the blender and pulse it on low a few times. Mix with the remaining diced tomatillos and the other ingredients in a small mixing bowl and mix. Using the food processor is totally optional, but doing it this way gets most of the salsa nice and smooth, but still with chunky bits. Note that this will have a very potent taste, so don't overload your tacos with it.


2. The Tofu
  • Press the tofu. Ideally, you should do this by placing it between two plates and putting something heavy on top (like a can), leaving it for 15-20 minutes. If you're short on time, just hold the tofu in your hands and squeeze it gently over the sink to release some of the water. Then cut the tofu into inch-sized cubes
  • Generously oil a pan and put in 1/2- 3/4 tsp. cumin seed. Let blacken over high heat, then turn down to medium.
  • Mix the corn meal, chili powder, ground cumin, and salt on a plate or shallow bowl. Roll or dip the tofu cubes into the dry mix and fry over medium heat 'til crispy, turning to fry each side and adding additional oil as necessary.
  • When done, leave the skillet coated in the spice for the onion mix, and if you have leftover cornmeal mix, dump that in as well.
3. The Onion/Chili Mix
  • Cut the onion into thin rings and saute over medium heat in the leftover spice mix from the tofu, adding more oil if needed.
  • Add the diced ancho, followed by the serano and 2 cloves of garlic. We also threw in some minced cilantro stems, reserving the leaves for the top.
  • Stir in the green pepper, then cook for a couple minutes more, removing while the pepper still has a bit of crunch.
4. The Assembly
  • Soften tortillas by placing in a dry skillet over high heat for 10-30 seconds a side.
  • Put on a layer of beans, followed by some of the onion mix, then 4-5 pieces of tofu.
  • Add cheese (if you get your hands on habernaro jack, a little goes a long way!), cilantro, and lettuce if desired, and drizzle a line or two of salsa, but take that easy because the flavor's quite intense! And enjoy, whether you're a foodie or not.

Saturday, May 1, 2010

Mexican Suns! (with baked tortilla chips)

Ok, so maybe these aren't authentically Mexican. Having never been to Mexico, I (Emily) don't know much about what authentic Mexican food is. However, these taste good, come together quickly and easily, and look like suns when they're done.

This dinner resulted from Iain getting home from work, exhausted, after a 10 mile (mostly uphill) bike ride. I, having been home from work for several hours already, was excited to cook. So I decided to play around in the kitchen while Iain showered and woke up a bit. The Mexican food resulted from the fact that Iain decided to buy tomatillos and other delicious things at the co-op this week, and I happened to have frozen corn.

Don't be intimidated by the relatively long ingredient list, as the veggies can be easily subbed in and out for each other and proportions easily adjusted.

Mexican Suns!

Ingredients
  • dash vegetable oil
  • dashes of cumin, chili powder, and garlic powder (adjust to taste)
  • 1 tomatillo, cut into small chunks or slices (feel free to use 2 if you've got them
  • half an onion (I used red-- yellow or white would work too, I'm sure)
  • 1-2 TBS tomato paste
  • 1 canned chipotle pepper in sauce, chopped really small
  • 1/2 green pepper, in small chunks
  • 1 can beans, rinsed and drained (I used a mix of kidney, pinto, and black. Use whatever you've got)
  • 1/2 bag frozen corn
  • 1/2 yellow pepper, in small chunks
  • 1 tomato, sliced or diced
  • 1/2 c. grated cheddar or jack cheese
  • bunch of cilantro, chopped
  • 3-4 flour tortillas, sliced into 6-8 wedges

Procedure
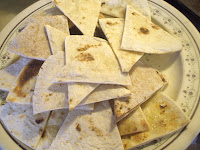
  • Prep the tortillas-- lightly oil a baking tray, place the tortillas on it (this may take two batches) and turn to coat. Sprinkle the wedges lightly with cumin, garlic powder, grated cheese, or a combination.
  • Heat the vegetable oil and toss in a little cumin, garlic powder, and chili powder. Add the onion and saute over medium heat for a few minutes, until it grows translucent.
  • Add the tomatillo. Cook over medium for a few minutes, then turn up to high for a minute or so in order to slightly brown the outsides. Turn back down to medium.
  • Stir in the chipotle pepper, tomato paste, and green pepper. (I also like to add a little of the cilantro here.) Cook over medium for a few minutes, until the pepper is starting to soften.
  • Add the corn, beans, and more of the cilantro, reserving a bit for the end. Add more cumin, chili powder, and garlic powder if desired.
  • Once everything is heated through, remove from heat and stir in the tomato, yellow pepper, reserved cilantro, and some of the cheese.
  • Broil the tortilla wedges for 1-3 minutes. Watch very carefully or they will burn.
  • Serve, preferably in the shape of a sun, with bean mix in the middle (topped by more cheese) and wedges around the outside.

Thursday, February 11, 2010

Ooey-Gooey-Crispy Mac and Cheese

We've been bad about posting the last couple weeks, not because we haven't been doing much cooking (we have) but because we've been busy and it's been cold and gross. Today is not cold and gross. Today is lovely and warm (relatively speaking), with a pale blue, winter sky. I heard birds chirping, and when I was walking from the bus stop home I didn't even need to wear my hat and mittens.

However, down in the dumps weather has its advantages-- namely the creation of some wonderful comfort foods. I have no idea where my Mom got this Mac and Cheese recipe (not that's it's so different from many other such recipes). I associate this with a well-thumbed index card, located on the front end of one of my Mom's many recipe boxes. In the interest of full disclosure, I don't have the exact recipe with me, and thus I might be missing an ingredient or two/have my proportions off, but what I've got works too. Enjoy.


Mac and Cheese à la Cohen

Ingredients
  • 1 lb box of pasta (rotini works really well, as do shells, and of course you can't go wrong with elbows. I'd recommend shapes over spaghetti type noodles)
  • 3 TBS butter
  • 3 TBS all-purpose flour
  • dash of worcestershire sauce
  • 2 1/2-2 3/4 cup milk (I used 1%--the higher the fat content the richer the sauce. This could be a good or bad thing.)
  • 1 lb cheddar cheese, grated
  • dash of parmesan cheese
  • toasted bread crumbs (about 2 slices of bread worth. I used a couple pieces of whole wheat bread, but use what you've got)
  • salt and pepper to taste
  • paprika (garnish)
Procedure
  • Grease a casserole or a 9"x 13" pan. I prefer the deep-dish casserole types, but we don't have one. The 9"x13" is a decent substitute.
  • Put up water to boil and prepare the pasta
  • Meanwhile, melt the butter in a medium saucepan over medium heat (simple, right?). Add the flour and whisk vigorously for 2-3 minutes. It'll get super clumpy and golden-looking. Add the worcestershire sauce.
  • Add the milk, slowly, stirring to eliminate lumps, and let cook for 10-15 minutes, stirring constantly. Milk burns super easily, so if this starts to happen you have the heat up too high. It should be on the low side of medium. Eventually, the milk will start to boil around the edges and thicken.
  • Remove the roux (that's the white sauce you've just made--congrats) from the heat, and stir in most of the cheddar, reserving enough to sprinkle fairly generously over the top of whatever pan you're using. Continue to stir until the cheese has melted. If you need to, you can turn the heat back on and keep it on low.
  • Dump the sauce onto the drained pasta and stir it up. At this point, it should look like a classy version of the stuff that comes out of a box. Season with salt and pepper.
  • Once the pasta and sauce are sufficiently mixed, dump the whole thing into your pan, pre-heat the oven to 375°F and get ready for toppings.
  • Sprinkle the bread crumbs all over the top of the Mac and Cheese and top them with the reserved cheddar and the parmesan. A dash of paprika makes a nice finishing touch.
  • Bake for 15-30 minutes, until the cheese is crispy to your satisfaction.
As a side note, the unbaked casserole will stay happy in a fridge for a day or two. Also, the unbaked casserole is super yummy too, and, whenever I make this, a few noodles inevitably disappear before being properly baked.

Saturday, December 5, 2009

Italian Thin-crust Pizza


So there's this pizza place in the Twin Cities called "Punch." There are a lot of lovely pizza places here-- "Pizza Lucé" and a few others are awesome places to grab a slice. In my opinion, Punch blows them out of the water. The three of us went first went to Punch on a gorgeous Saturday last June, where we sat outside on the patio and devoured exquisitely-prepared pizzas with buffalo mozzarella and sun-dried tomatoes. If you're in the cities and haven't been, GO. It's a bit pricey as far as pizzas go (maybe $10-$12 for an average pizza, which will feed one hungry guy or provide a meal and a snack for a girl like me), but it's so worth it.

Anyway, we decided after our experience there that we really wanted to try our hand at making our own pizza like that. We'd made pizza before--both regular crust and deep dish--but this would be new and exciting. We didn't have the advantages of san marino tomatoes, top-notch olive oil, imported mozzarella, and a wood-burning pizza oven kept at 800°F, but we did our best, beginning with the crust.

Ingredients (for two pizzas)
  • 1 1/3 c. wrist-temperature water
  • 2 1/4 tsp. yeast (or 1 package, if you buy it that way).
  • 3 1/2-3/4 cups flour (can use part whole wheat, I'd imagine, although we kept it all white this time)
  • 2 TBS olive oil
  • 1 TBS salt
  • about 1 1/2 TBS sugar
  • a sprinkling of corn meal
  • Toppings! (all suggestions-- amounts and ingredients are totally open, so make it as you like)
    • a few handfuls of canned diced tomatoes (fresh, soaked in a little olive oil and salt, would work great too-- we just happened to have the canned stuff)
    • a solid handful of basil, ripped or chopped into little pieces.
    • lots of shredded mozzarella. We didn't use the fresh stuff, but if you have it all the more power to you
    • several TBS of pesto
    • a sprinkling of coarse salt--kosher, sea, rock, etc.
    • a few handfuls of sauteed mushrooms
    • a handful of chopped sun-dried tomatoes
    • a clove or two of fresh garlic, minced
    • Generous drizzlings of olive oil

Part One: The Crust
  • In a large bowl, dissolve the yeast into the water and wait 5 minutes or so until it bubbles. If it doesn't bubble, make sure it smells like yeast before you keep going. If it doesn't, it might be dead yeast. Start over.
  • Add the flour, olive oil, sugar, and salt and mix slowly for a bit.
  • Turn onto a floured surface and knead for about 10 minutes until the dough is stretchy and smooth. Rub some olive oil into the bowl where you mixed the dough and dump the dough back in, flipping it around so it gets nicely coated with the oil. Cover the dough and let it rise until it doubles in bulk. It'll take an hour or two.
  • Punch down the dough and divide it into two balls. Let them rest for 10-15 minutes. Then roll them out. You want them pretty thin-- see how much of the cookie pan the dough takes up and try to do something similar. The ridge on the thin-crust shouldn't be as pronounced as that found on most regular crusts.
  • Note: Don't roll out both crusts at the same time unless you're baking them together. Just leave the other half in its ball until needed. Before you transfer the crust to the sheet, sprinkle it with corn meal or flour.


Part Two: The Topping

We started by tossing the salt and garlic over the crust, then followed with little spoonfuls of pesto, the tomatoes, sun-dried tomatoes, mushrooms, and basil. The cheese coated all of that, and we drizzled olive oil on top.


Part Three: Baking

So this is the bit that separates this pizza from its thicker-crusted counterparts. You want the oven as hot as it'll go. For us, that was 450 or 500°F. If yours gets any hotter, great. Also, if you have a pizza stone, great-- although I suppose you'd need to either have a large pizza stone or make smaller pizzas to get a crust thin enough.

Bake for about 8 minutes. The crust should get really crispy and everything should bubble. If it gets a little brown that's even better. It won't be as good as the stuff made in a proper oven, but for us it worked well. Also, your oven could be quite different from ours, so just watch it and see if it needs more or less time. Serve quickly, because it's awesome hot, but don't burn the roof of your mouth!