Friday, December 18, 2009

Boswell Chili

Hey guys. Hope you've been enjoying your latkes, and now you can have the authentic Boshenke accompaniment. Boshenke being the communal name for Emily, Iain and myself, a merger of our last names that is an inevitable title for our forthcoming restaurant (forthcoming being in approx. three decades). This is based on my Dad's recipe, and is only slightly modified from it because I couldn't find some of the right ingredients in Ireland, where I first learned how to cook for myself. If you want to make this a meat recipe, you can sub out one of the cans of beans for 1lb. ground meat, cooking the ground meat in a skillet over medium-high heat until no longer pink, and draining off the grease that sweats from the meat for later use. Add it in with the beans, corn, tomatoes and spices.

Boswell Chili

Ingredients
2 bell peppers
2 15oz or so cans of beans, whatever kind tickles your fancy
1 32oz/28oz/whatever big variety of can diced tomatoes
1 onion
5 cloves of garlic
10oz package frozen sweet corn, about 1 1/4 cups
1/3 or so of a thai pepper or as much as you like of another spicy variety
160z broth of some kind. I made my own from some leftover broccoli stems and scallions and the husks of onions and garlic I chopped for this meal. Pretty straightforward, just cut everything up, saute it in butter on medium or so heat to soften and release flavor, but don't let anything brown or cook too much, then cover in water and boil/simmer for 45 minutes - an hour. Instant veggie broth. Just be sure to drain it and toss the solids, they're kind of gross.
2 Tablespoons chili powder
1 teaspoon oregano
1 teaspoon cumin
1 Tablespoon salt
olive oil

Supplies
Large pot
Cutting board
Knife
Wooden spoon

Tuneage
Minnesota Public Radio! They had some sweet harp music on the air at cooking time.

1. Cut things - dice your onion, cut out the stems of the peppers and cut everything into nice little chunks, 1/4-1/2". Mince the garlic and spicy pepper. SAFETY WARNING: always wash your hands after you cut spicy peppers, *especially* if you are male and plan on going to the bathroom. There are certain things that are OK to visit a man's secret regions, chili oil is not one of them.

2. First saute - drop some olive oil into your large pot - a couple tablespoons, maybe? I never measure oil. Just put enough so that whatever you're frying doesn't burn, but not so much that everything gets soggy and greasy. Heat it up to just above medium and throw in all your sauteables - the onion, peppers, and garlic, and this is when you cook your meat, too, if you're eating omnivorously. Cook this until the onions are translucent, stirring well to keep things from sticking to the bottom.

3. Add and stew - throw in the tomatoes, corn, beans, broth, and spices - the salt, cumin, and chili powder. You don't have to be exact with the cumin and chili powder. I usually add a little more. This most recent recipe was blessed by fate and my approximate heapings turned out to be exactly right. Let this boil first, then reduce down to a gentle simmer and let it go for at least 45 minutes, preferably and hour and a quarter. Don't cook it so much that the peppers get really mushy. I have never had this happen but I believe it to be theoretically possible.

And you're done! Taste it at the end to make sure it's good. If it's not flavorful enough, add more salt and/or oregano; if it needs more of a kick, add chili powder; if it's too thin or needs fortification add some cumin. Dress it with grated cheddar. My dad puts cilantro on it and while I like cilantro, too, they didn't have it in Ireland so I never remember to get it.

Peace, love, chili!

Aerarbran Stew


Hello denizens of the internet! My post of a na latha (of the day anns a Ghaidhlig, which I am speaking in for no good reason) is a little bit dorky. Today, I bring you the best in regional foods of regions that don't exist!

Perhaps I should explain myself. Here at Yummies Kitchen, we do more than just cook. All three of us are also writers of fiction, and all of our works deal with fictional cultures. The other day, a thought struck us: what do they eat in these places? And then we decided to answer that question by cooking their food!

The culture I was exploring that created this dish is based in a forest with flora and fauna greatly resembling the North Woods. That means there were such things as edible roots, cherries, wild rice and mushrooms, which is exactly what I decided to make this dish out of. Exactly half of us were skeptical of combining these things (Emily and half of me) and the other half were really enthusiastic about it (Bozzie and the other half of me). It actually turned out better than I could have hoped, and the results caused Emily to say "I never would have thought it, but this turned out really well!"

Aerarbran Stew with Cherries and Wild Rice

Ingredients
3 cloves garlic
1 white onion
1 turnip
1 large potato
5 mushrooms
2/3 cup wild rice
1/2 cup rice
2/3 cup dried sour cherries
2 cups Veggie broth
1 tbs butter
salt and pepper

Materials
Knife and Cutting board
Medium-large skillet
Lid that fits over skillet
Wooden Spoon

Music Listened To
Amal and the Night Visitors was playing on MPR, I believe

1. Chop the onion and garlic. Peel the turnip and cube both the turnip and the potato. Slice the mushrooms.

2. Sautee the garlic and onions over low-med heat until translucent. They should taste generally sweet before proceeding.

3. Add turnip and potato. Add the broth, rice, wild rice, salt and pepper. Bring to a boil and simmer 5-10 minutes.

4. Add the cherries and mushrooms. Simmer 10-15 minutes, until the rice is soft enough to eat.


It's really quite a simple recipe, when it comes down to it, but it turned out delicious. It can work either as a main course, or you could have it alongside other dishes. Perhaps you may want to try it for your Christmas dinner, side by side with your favorite savories (or your fave saves as I have just decided I like to call them).

And, as is our philosophy at Yummies!, don't just do it by the book! Improvise a little! I was thinking that next time I'd try to get some wild mushrooms instead of button or crimini. Maybe you're more carnivorous than me, so try putting some white meat in it! Or maybe a splash or white wine? The choice is yours!

We now close with the prayer of thanks I came up with on the bus knowing one would be required:

We thank the forest
We thank the earth
for our food
and for our birth.

Thursday, December 17, 2009

Latkes!

Ok. So basically what happened is that I didn't get to make latkes on Sunday (the day I'd planned because my friends came over to bake cookies and we had tons of fun but didn't finish up until almost 9 and we'd all eaten so many cookies/so much dough that something as heavy as latkes was completely out of the question. So instead I waited until Tuesday, which was the next day that the Ia(i)ns and I would be able to eat dinner together. This also happened to be the day Bozzie was making chili. He'd thought about cornbread as a side, but that just didn't happen.

Latkes go as deep into my memory as anything. I don't remember the first time we made them, but I have a number of images of my Dad standing in the kitchen, apron on, potato in one hand and grater in the other. (Ok, so sometimes we used the cuisinart too). Latkes are deep-fried, so there's no point in trying to make them healthy, but they taste amazing. Believe me. I'm not normally one to go for fried foods. Since latkes are a traditionally Jewish food, there are probably as many recipes as there are Jews in the world. This is the one my family uses. Happy Hanukkah!

Potato Latkes

Ingredients

Note: This recipe is given in proportions rather than exact amounts. The numbers in parentheses are what I used, and I made about 20 latkes from the batch. Each person ate about 3-4 and we had leftovers.
  • Potatoes(6 medium)
  • 1 onion for every 2 potatoes (3 medium)
  • 1 egg for every 1 potato (6)
  • 1/4 cup flour for every potato potatoes(1 1/2 cups)
  • 1/4 tsp salt for each potato (1 1/2 tsp)
  • Black pepper. Lots.
  • Ditto on the canola oil

Procedure
  • Put up a pot of water to boil
  • Scrub the potatoes. You can peel them if you like, but I wouldn't suggest it. Grate them into little bits like hashbrowns. You can use a food processor, but, as my Great Grandma Rhea from what is now Belarus said "Latkes are no good unless they have a little bit of knuckle in them." (Apparently this phrase was not her invention--I've heard it tossed around by other Jewish grandmothers).
  • Parboil the potatoes for about 5 minutes. You don't need them to be completely soft, but you want them to get cooked enough that they run no risk of tasting like raw potato once finished. You may have to do this in batches, depending on how many potatoes you have.
  • Meanwhile, grate the onions and stick them into a large mixing bowl
  • Drain the potatoes into a colander, rinse with lots of cold water, and squeeze out the excess moisture. I found the method for this to be picking up handfuls and squeezing them repeatedly, then tossing them in the mixing bowl.
  • Throw in the eggs, flour, salt and pepper, and mix well. It'll look pretty gooey and white at this point, most likely. That's a good thing.
  • Get the oil going. I pour 1/4-1/2 inch depth on the bottom of the skillet and the way I test its readiness is by throwing in a little tiny piece of latke. When it starts sizzling, you're in business.
  • Using a spoon (or whatever really) scoop latke mix from the bowl and throw it into the skillet. I usually do three at a time. Let them sizzle along and press them down a bit with a spatula or spoon. The time will vary wildly, and so will the temperature you need to keep the skillet on, because the oil keeps getting hotter. When it's nicely browned on one side, flip it and let it cook until it seems done on the other side. Taste the first one to make sure it doesn't need more salt. If the batter seems too thin, add some flour.
  • When the latkes come out of the skillet, have a plate layered with paper towels ready so they can drain. Once they've drained a bit, it's a good idea to put them into an oven on "warm" until it's time to eat. You can cook all of the batter and reheat the leftovers in the oven (a microwave will do too, but that doesn't lend the nice crispy quality of an oven or toaster oven). You can also store batter in the fridge for a few days.
  • For the record, applesauce is a much better accompaniment for latkes than chili, but chili worked surprisingly well. Some people like sour cream on top. I'm not really sure why. In fact, I'm not really sure why people like sour cream on top of anything....

Wednesday, December 16, 2009

Hmm?


Emily (while cooking latkes): Oh darnit, we don't have any applesauce!

Bozzie: That's ok. We have chili.


Explanation/Recipes coming soon...

Tuesday, December 15, 2009

Grilled Spinach and Cheese Sandwich

When I get home from my job at the Cheeky Monkey Deli, unless I've grabbed a sandwich there I'm usually pretty hungry, 'cause I've been working through lunch and I don't get to eat it myself until I get off. So I want something pretty quick, but I also want something really tasty, because I've been surrounded by great food all day. So just the other day I came back and made this:


I probably could have taken a better picture, but I think you get the point. It's a grilled spinach and cheese sandwich, and it's about the easiest and most rewarding thing to make when you have the three magical things in your fridge. The key here is to use *good* quality bread, spinach, and cheese. I mean, don't go overboard and get super fancy stuff, I'm just talking about regular-good. I baked the bread myself (you don't have to do that, but it sure is fun and you get some delicious, delicious bread for super cheap, if you've got the time), the cheese is from an Iowan dairy that uses milk from Amish farmers (so freakin' good: http://www.miltoncreamery.com/ if you're in the area, it was at our co-op in Minneapolis), the spinach was organic, blah blah blah but I think it's important that you start with good ingredients that weren't treated with nasty chemicals. Did you know that a big reason why we use so many pesticides and fertilizers and stuff is that after WWII we weren't making as many bombs and poisons, so they converted the chemical factories so they would make things we could dump on our farmland to make stuff grow better? Weird, no? You'd think that since we've been doing fine without industrially produced agricultural chemicals for, say, all of human history, maybe it wouldn't be so weird to try farming without them.

OK, rant's over, let's get to the food.

Grilled Spinach and Cheese Sandwich

Ingredients
  • Bread
  • Spinach
  • Cheese
  • Olive oil
  • Salt and pepper
Kitchen Supplies
  • A skillet
  • Spatula
Tuneage
93.7 The Current

Wash your spinach well. It sucks to have dirt as a flavor, as great as it is in other contexts. You don't even need to cut it up. Just heat up a dash of olive oil (not too much, the spinach sweats a lot and you end up with a lot of liquid that you just pour out) (this is on medium heat), throw in your spinach leaves, and throw on a little (!) salt. Never oversalt, it really stinks to try and fix it. Just remember, you can always add more salt later. Grind on some pepper and stir it around until it starts to wilt. At this point, there should be a little green puddle in the bottom of the skillet. Hold back the spinach with your spatula and let most of it drain out. Now add in the cheese that you've already chopped up or grated, as much or little as you like. Continue to cook, stirring a lot, until the cheese is melted in and the spinach is a vibrant green and well wilted, but not overcooked. While this is happening, stick your slices of bread in the toaster. When your bread pops up and the cheese and spinach is ready (really, it's ready whenever, because you could eat it uncooked if you were in the mood), scoop out the spinachcheese and stick it between the two slices, forming the essential sandwich structure. Now stick the sandwich into the skillet, where there should be some residual mix of oil, spinachy water, and cheese. Let the sandwich fry in this awesome mixture for a while, turning it over before it starts to blacken or smoke. You could turn up the heat a little bit if you wanted but you don't have to. It should take 2-3 minutes on each side. Keep turning to check to see that it's being fried properly, and acquiring an excellent orange color. You could press it down, too, if you wanted. Once the sandwich is solidly together, it is done - it shall be one unit, rather than a loose collection of bread and fillings, and shall move and act as one. Cut it into two triangles because it tastes better that way.

Sabor!

Sunday, December 13, 2009

Toffee Triangles

Happy Holidays to one and all! Hanukkah is in full swing (third night coming up-- I have my JCC menorah that I made when I was three, and I found candles at target). You can expect a post on latkes later this week. Also sufgoniyot, but only if I get really ambitious. For now, however, I have a Christmas tradition to share. For those of you going "But I thought you were Jewish," I should point out that my mom is Quaker (and for those of you now going "Well, then you can't be Jewish," we should have a nice little chat.) Anyway, since my mom grew up with Christmas, we've always had a Christmas tree in our house, and on Christmas Eve we sing Christmas carols and have a candlelit tea party with lots of lots of cookies. It's great fun. These particular cookies have been a staple for our tea party since I can remember. I made this particular batch for a Christmas party that I didn't end up going to because we went to see Bozzie's play and got home later than expected (sorry Eric!). But they're still fantastic cookies (and freeze super well). I mean, this is a recipe that I actually follow instead of improvising my way through. Ok, so I may not have measured the flour exactly (sorry Mom).


Toffee Triangles

Ingredients
  • 3/4 cup butter (1 1/2 sticks), softened
  • 3/4 cup brown sugar
  • 1 egg yolk
  • 1 1/2 cups flour
  • 1/4 tsp salt
  • 1 14 oz can sweetened condensed milk (fat free or not--but keep in mind that condensed milk is not the same as evaporated milk)
  • 2 TBS butter
  • 2 tsp. vanilla extract
  • 2 cups chocolate chips or chopped chocolate. These are sweet bars, so I like to use semi-sweet chocolate, but milk would be fine too
  • 1 cup crushed heath bars or other toffee bits (if they're coated in chocolate that's fine)


Procedure
  • Preheat the oven to 350°F
  • Cream the butter and sugar (always an auspicious start--I mean, how can something that starts out like this not be good?)
  • Add in the egg yolk and mix well. For those of you who don't know how to separate eggs, basically what you want to do is crack the egg over a bowl and tip the yolk back and forth from one half of the shell to the other, letting the white drip into the bowl (if you're not saving the white, you can also do this over a sink and save yourself having to clean a bowl).
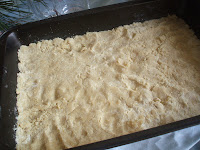
  • Mix in the flour and salt. The dough will be very, very crumbly. When everything's incorporated, tip it into a well-greased 9x13 pan (I prefer the glass ones, but we don't have one here, so metal works too). Pat it down and lick your hands, because they'll taste really good (why yes, of course that's in the original recipe). It should look like this.
  • Bake for about 20 minutes or until the top is golden brown
  • Meanwhile, pour the sweetened condensed milk into a small-medium saucepan and put in the butter. Cook over medium low heat, stirring constantly, until it comes to a low boil. Then keep cooking for 3-5 minutes until it's thick and creamy. This is the most difficult part of the recipe because this stuff burns super, super easily. Like, it'll go from good to charred in seconds. So keep a close watch on it and keep stirring. According to my mom, if brown bits start to come up from the bottom, stop cooking it immediately, pick out the biggest brown pieces, and don't think about it anymore because it'll still taste good.
  • Once the milk has reached the desired consistency, pour in the vanilla and mix it in, then quickly remove from heat.
  • When the cookie layer is done, pour the milk mix on top, using a spatula to spread it around, and bake for 10-12 minutes more, until set and golden.
  • Here's the fun part. As soon as the bars come out of the oven, sprinkle on the chocolate and stick them back in for a minute or two so it melts. Then use a spatula to spread the chocolate (if the chocolate isn't spreadable, stick it back in the oven for a minute until it is. Mmmm.
  • Sprinkle the toffee bits on top and let the whole thing cool for a bit. Looks heavenly, right? The longer you let them cool, the easier they'll be to cut (theoretically). The chocolate will eventually harden, and if you're trying to layer them on a plate like I was yesterday you can stick them in the fridge to quicken this process.
  • When you cut them, I find it easiest to cut squares/rectangles first and then cut each one diagonally to form two triangles. I suppose ultimately there's no reason these must be toffee triangles and not toffee squares, but I like that shape much better (as well as the resulting alliteration). Hey, try it, see what works for you. Dangerously enough, these are just as good right out of the freezer as they are right out of the oven, so if you're trying to do Christmas yummies in moderation (or hide some of the cookies until the candlelit tea party, like my mom does,)the freezer is not an adequate deterrent. Just sayin'....

Saturday, December 12, 2009

Spinach and Mushroom Alfredo


So, quick post this week. Is this week's recipe extremely inventive? Not so much. Is it delicious, warm, filling and easy to make? Why, yes! Glad you asked!
I (Iain) first prepared this dish on the fly when cooking for a large group and someone else had already procured the ingredients. I just followed my cooking instincts and put together the ingredients I thought sounded good, and the result was deemed "orgasmic" in the words of one of the eaters. After getting such a good reception for it that first time I've gone on to prepare it several more times since, and it never fails for a good dinner in not a lot of time.

Spinach and Mushroom Alfredo

Ingredients
1 lb fettuccine
1 cup heavy cream
1 stick of butter
1 cup Parmesan
salt and pepper
15-20 mushrooms
4 medium-large cloves garlic, minced
3 hefty handfuls of spinach
butter for sauteing

Materials
Knife and Cutting Board
Skillet
Large pot
Wooden spoon
Tongs

Music Listened To
"Dublin Lady" by Andy M Stewart

1. Bring the water to a boil and add the fettuccine. In the meantime, slice your mushrooms and mince your garlic. Heat the skillet with some butter (don't go too skimpy - if you're making this dish, throw your fat content worries to the wind). Saute the mushrooms with most of the garlic - I usually add some basil to this step.

2. Once the pasta is done, drain it (promptly!) and throw in the butter, cream and Parmesan. Add the remaining garlic, salt and pepper. Stir together over low heat and turn off once combined. In the meantime, add the spinach to the mushrooms and stir until the spinach is cooked down.

3. Dump the spinach and mushrooms into the pasta and suace. Stir together with tongs and serve!

Pretty simple, eh? Despite my previous comment, if you DO want to make the dish less heavy, saute the mushrooms in a little olive oil instead (it'll go farther than the butter) and sub milk in for the heavy cream. You can also cut down on the butter in the sauce. It won't be quite as delicious, but it should still taste good and it won't be quite so much of a heavyweight. I personally like the heaviness of it now that it's winter and it takes probably twice as much food to fill me up, but I also, as has been observed, am a black hole when it comes to food.

Enjoy!

Saturday, December 5, 2009

Italian Thin-crust Pizza


So there's this pizza place in the Twin Cities called "Punch." There are a lot of lovely pizza places here-- "Pizza Lucé" and a few others are awesome places to grab a slice. In my opinion, Punch blows them out of the water. The three of us went first went to Punch on a gorgeous Saturday last June, where we sat outside on the patio and devoured exquisitely-prepared pizzas with buffalo mozzarella and sun-dried tomatoes. If you're in the cities and haven't been, GO. It's a bit pricey as far as pizzas go (maybe $10-$12 for an average pizza, which will feed one hungry guy or provide a meal and a snack for a girl like me), but it's so worth it.

Anyway, we decided after our experience there that we really wanted to try our hand at making our own pizza like that. We'd made pizza before--both regular crust and deep dish--but this would be new and exciting. We didn't have the advantages of san marino tomatoes, top-notch olive oil, imported mozzarella, and a wood-burning pizza oven kept at 800°F, but we did our best, beginning with the crust.

Ingredients (for two pizzas)
  • 1 1/3 c. wrist-temperature water
  • 2 1/4 tsp. yeast (or 1 package, if you buy it that way).
  • 3 1/2-3/4 cups flour (can use part whole wheat, I'd imagine, although we kept it all white this time)
  • 2 TBS olive oil
  • 1 TBS salt
  • about 1 1/2 TBS sugar
  • a sprinkling of corn meal
  • Toppings! (all suggestions-- amounts and ingredients are totally open, so make it as you like)
    • a few handfuls of canned diced tomatoes (fresh, soaked in a little olive oil and salt, would work great too-- we just happened to have the canned stuff)
    • a solid handful of basil, ripped or chopped into little pieces.
    • lots of shredded mozzarella. We didn't use the fresh stuff, but if you have it all the more power to you
    • several TBS of pesto
    • a sprinkling of coarse salt--kosher, sea, rock, etc.
    • a few handfuls of sauteed mushrooms
    • a handful of chopped sun-dried tomatoes
    • a clove or two of fresh garlic, minced
    • Generous drizzlings of olive oil

Part One: The Crust
  • In a large bowl, dissolve the yeast into the water and wait 5 minutes or so until it bubbles. If it doesn't bubble, make sure it smells like yeast before you keep going. If it doesn't, it might be dead yeast. Start over.
  • Add the flour, olive oil, sugar, and salt and mix slowly for a bit.
  • Turn onto a floured surface and knead for about 10 minutes until the dough is stretchy and smooth. Rub some olive oil into the bowl where you mixed the dough and dump the dough back in, flipping it around so it gets nicely coated with the oil. Cover the dough and let it rise until it doubles in bulk. It'll take an hour or two.
  • Punch down the dough and divide it into two balls. Let them rest for 10-15 minutes. Then roll them out. You want them pretty thin-- see how much of the cookie pan the dough takes up and try to do something similar. The ridge on the thin-crust shouldn't be as pronounced as that found on most regular crusts.
  • Note: Don't roll out both crusts at the same time unless you're baking them together. Just leave the other half in its ball until needed. Before you transfer the crust to the sheet, sprinkle it with corn meal or flour.


Part Two: The Topping

We started by tossing the salt and garlic over the crust, then followed with little spoonfuls of pesto, the tomatoes, sun-dried tomatoes, mushrooms, and basil. The cheese coated all of that, and we drizzled olive oil on top.


Part Three: Baking

So this is the bit that separates this pizza from its thicker-crusted counterparts. You want the oven as hot as it'll go. For us, that was 450 or 500°F. If yours gets any hotter, great. Also, if you have a pizza stone, great-- although I suppose you'd need to either have a large pizza stone or make smaller pizzas to get a crust thin enough.

Bake for about 8 minutes. The crust should get really crispy and everything should bubble. If it gets a little brown that's even better. It won't be as good as the stuff made in a proper oven, but for us it worked well. Also, your oven could be quite different from ours, so just watch it and see if it needs more or less time. Serve quickly, because it's awesome hot, but don't burn the roof of your mouth!

Wednesday, December 2, 2009

Vegetarian Haggis

Half of you just said "Vegetarian WHAT???"
The other half of you just said "Wait, WHAT kind of Haggis???"
This is a dish that never fails to get an amusing reaction from first-timers when they hear about it. Two of my favorites have been:
"Wouldn't that just be oatmeal?"
and
"I would be honored to eat such an oxymoronic dish!"

Silly reactions aside, this is an original Iain recipe that I first developed a couple years ago, and since has become an all-time favorite. When I studied for a semester at the University of Edinburgh, the President of the University gave us a greeting speech, in which he gave us a list of imperatives for our time in Edinburgh. Among the more traditional ones such as "study hard" were "go to a ceilidh," "climb Arthur's Seat," and "eat haggis - even the vegetarian varieties have become very good indeed as well, so no excuses!" I took all three bits of advice to heart and fell in love with the dish, so that when I came back home to the States, I was forlorn at the thought of not being able to enjoy it again until my return to Scotland! So I did some research and developed my own recipe to emulate the best Veggie Haggises as I remembered them looking, feeling and tasting. Many were skeptical (including Emily, who didn't really believe such a dish could be truly vegetarianized) and all were made believers, and since St. Andrew's Day was on Monday, I am pleased to bring this recipe to you!

I might also mention, the word "haggis" sounds hilarious with a Minnesota accent. "Hay-gis." Teeheeheehee :)

Let the Haggissing commence!


Dove Vegetarian Haggis
(With Neeps 'n' Tatties!)


Ingredients:
1 large white onion (diced)
1 large grated carrot
1 cup of minced mushrooms
2 cups dry green lentils
3 cups vegetable broth
1 can of kidney beans (rinsed, chopped)
1 cup of crushed/chopped nuts (walnuts, peanuts and hazelnuts are all good)
Juice of 1 lemon
1 tbs + thyme
2 tsp + rosemary
1 whallop cayenne powder (or half a seeded thai chili)
generous salt & pepper
1 cup steel cut oats
1 generous slug of Whisky
The heart, lungs and liver of a sheep (kidding! kidding!)

2 medium-large turnips
4 medium potatoes
butter
salt
milk

Materials:
Cutting boards and Knives
At least 1 large and 1 medium pot
Wooden spoon
9x13 baking pan
Masher
Kilt

Music Listened To:
The Thistle and Shamrock Celtic Christmas Ceilidh

Procedure:

1. Prep. Prepare all ingredients as listed. Generally the smaller you can cut things up the better. For the nuts, you may want to try putting them in a bag and bashing them with a rolling pin until they are in small, coarse bits. I recommend making your own veggie broth - I used leek greens and scallions seasoned with garlic, rosemary, thyme and bay leaves, although this takes a good couple hours.

2. Heat some butter or oil in a large pot and saute the onions for about five minutes.

3. Add the carrot, beans, nuts and mushrooms and continue sauteing for another five minutes. Add butter or oil as necessary.

4. Add the lentils and the broth. Bring to a boil and simmer 15 minutes. Add the seasonings once simmering (do NOT go easy on the seasonings, and do NOT stick your finger in your nose after chopping hot peppers FOR THE LOVE OF GOD!!)

5. Add the oatmeal and the whisky. Simmer another 15-20 minutes. Preheat the oven to 375 degrees.

6. Bake for 30-40 minutes. This is a good time to prepare the neeps and tatties! Peel and cube the turnips and potatoes and bring 2 pots of water to a boil. Boil the neeps for 15 minutes, the tatties for about 10. Drain and mash both, add butter salt and milk to the tatties to your preference.

7. Pipe in and serve! I personally use a ladle for the the haggis and an ice cream scoop on the neeps and tatties to get that nice rounded look.

I very much hope you enjoy this recipe (Burns night comes on January 25th!). Do note that this recipe yeilds a LOT of food, and it is quite filling, so, if ye're a wee weak Sassainach, feel free to half it. I personally will be enjoying it for lunch for probably almost a week! This last time I made it, it turned out the best it ever has - definitely don't take it easy on the seasonings, since they all bolster each other, producing that unique haggis taste.

Cheers!


Tuesday, December 1, 2009

Pumpkin Chocolate Biscotti!


So I don't think it's been mentioned before that both the Ia(i)ns and I are in a mostly-sacred, often-early music vocal ensemble (if we only had an alto we'd have a complete SATB set for our house). We were in choir at Macalester together and had a difficult time thinking of going from 4-5 days a week of singing to none. Plus early music is absolutely gorgeous and ridiculously fun to sing. Last Sunday The Gregorian Singers had an Advent Procession (my first, being, y'know, Jewish), and afterwards we had a potluck party to go to.

I was scrambling for something to make since we'd all just gotten back from Thanksgiving to a mostly-devoid-of-groceries house when I suddenly remembered the 128 Cookie Recipe magazine my mom bought me for airport reading. Flipping through it, I spotted a few biscotti recipes that looked fun, but I didn't have all the ingredients for any of them. I was also in the position of having a half can of pumpkin in my fridge. While easy and tempting enough to make more pumpkin bread, I figured it'd be more interesting to try something new. Thus, a baking adventure seemed prudent. This was only my second attempt at biscotti of any sort, but I think they actually went well! And they're a very different deal than the chocolate chip pumpkin bread, regardless of the similarities in recipe form.


Ingredients
  • 1/4 c. butter (half a stick- you could go up to 6 TBS)softened
  • 3/4 cup sugar
  • 2 eggs
  • about 1/2 cup pureed pumpkin
  • 1 tsp. vanilla
  • 1 1/2 tsp. baking powder
  • 1 1/2 tsp cinnamon
  • 1/2 tsp. ginger
  • 1/4 tsp cloves
  • 1/4 tsp nutmeg
  • dash of salt
  • 3 cups flour
  • about 2/3 chocolate chips or chopped dark or semi-sweet chocolate (I actually chopped the chocolate chips a bit so they'd get better incorporated).
Procedure

Now, just as a disclaimer, there are a lot of ideas of what makes a biscotti truly a biscotti. I don't really know any of them. All I know is that biscotti must be twice baked. Also, this is a baking adventure; measurements are approximate.
  • Preheat the oven to 375°F.
  • Combine pumpkin and butter in a large bowl and mix well. There will be some lumps. Don't worry too much about those, but don't leave huge chunks of butter.
  • Add the sugar and baking powder and salt, then the eggs and vanilla, then the spices.
  • Stir in the flour. A mixer would make this easier, but you can do it! It will make a stiff dough. Throw the chocolate in and incorporate it as best you can.
  • Dump the dough onto a lightly floured surface and split it into two. Make two logs out of it like the one in the picture. They should be about 8"-12" long. Just pat the dough into place-- it should stick pretty easily, since it's so stiff.
  • Stick the rolls on a baking sheet (ungreased) and pop them in the oven for about 20-25 minutes or until a toothpick comes out clean.
  • Cool for awhile and then cut the logs very carefully, in a sawing motion with a serrated knife into slices. Mine were 1/4-1/2 inch thick. If your logs are like mine, some of the pieces will crumble a bit, but that's ok.
  • Place the slices on a baking sheet like the one above, reset the oven to 325°F, and bake for 10 minutes. Then flip and bake about 10 minutes more. Actually, they'd probably be fine if you didn't flip them, but I did. If they come out a little soft in the middle don't worry. They'll crisp up while cooling.
I recommend dunking in tea or cocoa.