Showing posts with label chocolate. Show all posts

Wednesday, June 9, 2010

The Best Brownies

Alright, so I (Emily) know that I've been doing the bulk of the posting lately, and that the vast majority of said posts have involved baked goods of some sort or another. Allow me to take this moment to explain.

On July 1st, I am leaving the Twin Cities to spend two weeks with my family in Georgia.

On July 14th, I am leaving Georgia to spend two years with a bunch of strangers in China. (I'm one of 30 international teaching fellows who will join up with 30 Chinese teaching fellows to form the China Education Initiative's 2010-12 cohort. Eek!)

China doesn't really do the whole baking thing, and when I studied abroad in Beijing my junior year I remember my friend's Chinese roommate was unable to handle the sweetness of dark chocolate. In other words, in a little over a month I'm going to have to begin finding some way to compensate for my lack of baking delicious things on a regular basis. For the time being, I'm baking up a storm.

These particular brownies came about because I found a ghirardelli 100% cacao bar for $2.50 and couldn't resist, so I decided to make something extra special and went on a quest for "The Best Brownies." Of course, after half an hour's pouring over both cookbook and internet recipes, I didn't find anything that struck me as the ultimate chocolate treat. So instead of being reasonable and picking out one of what were probably several close seconds, I decided to have a baking adventure and make it up as I went along. It's quite simple and amazing. Also, I was so excited I forgot to take pictures, but it looks like a brownie when it's done. Trust me.

Chewy Chocolate Fudgy INCREDIBLE Brownies

Ingredients
  • 4 oz unsweetened chocolate (1 ghirardelli baking bar)
  • 4 tsp. cocoa powder
  • 2 sticks butter (1 cup), softened
  • 3/4 cup sugar
  • 3/4 cup brown sugar
  • 4 eggs, at room temperature
  • 2 tsp. vanilla extract
  • 1/2 tsp. baking powder
  • 3/4 cup flour
  • 2 TBS cocoa powder
  • 2/3-3/4 cup chocolate chips
  • a pinch or so of salt
Procedure
  • Melt the chocolate and 4 tsp. cocoa powder together. I used the double boiler method. Let it cool for at least 8-10 minutes.
  • Preheat the oven to 350°F
  • Cream the butter and sugars together until well blended. You shouldn't see any "spots" of butter. Depending on how soft the butter is, this'll take anywhere from 1-5 minutes
  • Stir in the eggs one at a time, then add the vanilla extract.
  • Gently whisk or stir in the melted chocolate.
  • Stir in the baking powder and flour, then add the 2 TBS cocoa powder. Everything should be smooth and a rich brown.
  • Fold in the chocolate chips.
  • Pour the batter into a well-greased 9"x13" pan. It should be thick. You will need a spatula to get out the last of it. Spread the batter evenly, and sprinkle a little bit of salt over the top.
  • Bake for 25 minutes, checking after about 20. When a toothpick comes out with a few crumbs sticking to it, they're done.
  • Let the brownies cool in the pan, placed atop a baking rack.
In terms of cooling times, you can eat them as soon as 10 minutes after they come out of the oven, but I'd say wait at least half an hour. These brownies honestly didn't hit their peak until day 3--when they tasted almost as though they were spiked with some kind of liqueur, they were so flavorful and chocolaty. Truly amazing.

Oh, and you'll need some milk. Or water. Or ice cream. Or something!

Monday, May 17, 2010

Very Very Special Occasion Chocolate Raspberry Cake

Well, what can I say? Iain's 23rd birthday was a little over a week ago, and I (Emily) know that chocolate with berries is his favorite kind of cake. Each year for the last three I've sorta tried to out-do my previous chocolate-and-berry cake, and this year I think I took it as far as I ever will. I won't say that this is the best cake I've ever had. Cakes, like brownies, come in many forms, and thus cannot be stacked up against each other as though all of the same make. However, I will say that when it comes to rich, chocolaty cakes, this one was quite excellent, and I had a really fun time making (and decorating, and serving, and eating) it.

This recipe comes in 5 parts: cake, filling, raspberry-cream, ganache, and assembly. I didn't photograph each section as well as I might have, but hopefully there will be enough guidance for all. Not including chill time, the whole thing took about 3 hours to put together (I think). Do it on a day where you've got time, and do let the whole thing chill in the fridge for an hour+ (as long as you want, really), so the chocolate firms up nicely.


Chocolate Raspberry Cake

Ingredients (for a 2-layer cake)
  • 2 cups flour (pastry would be ideal, but I used all-purpose)
  • 1 tsp. baking soda
  • 1/4 tsp salt
  • 2/3 cup cocoa powder
  • 2/3 cup hot water
  • 2/3 cup lukewarm milk
  • 1 1/4 sticks (10 TBS) unsalted butter, softened and cut into pieces
  • 1 1/2-3/4 cup sugar
  • 1 1/4 tsp vanilla extract
  • 3 large eggs, left out on the counter for a bit
  • 1/2 cup chocolate chips
  • about 1/3 cup frozen strawberries, left out for 10 minutes and smashed with a fork
  • about 30 raspberries (fresh or frozen), reserved for decoration
Procedure
  • Pre-heat the oven to 350°F and grease two 9" round cake pans (or 8 or 10 if you don't have 9s. Your layers will be taller or shorter accordingly). Line with wax paper, then grease the paper.
  • Whisk the flour, baking soda, and salt together in a medium bowl.
  • Whisk the cocoa and hot water in a small bowl, then whisk in the milk.
  • In a large bowl, beat the butter until very creamy (this will take a few minutes if you're doing it by hand). Gradually stir in the sugar and beat 'till light and fluffy, then add the vanilla. Beat in the eggs one at a time.
  • Add 1/3 of the flour mixture to the butter mix, stirring well. Follow with 1/2 of the cocoa mixture, another 1/3 of the flour, the rest of the cocoa, and the rest of the flour. Stir slowly after each addition until it's incorporated.
  • Stir in the chocolate chips and raspberries
  • Pour half of the batter into each pan and smooth with a spatula. Bake for 30-35 minutes until a toothpick comes out with a few crumbs.
  • Cool in the pans for 10 minutes, then transfer to a rack. Let them cool for a good long while before trying to frost. (That was a mistake I made. Oops!)
Chocolate-Cream Cheese Filling
Ingredients
  • one 3-4 oz. bar milk chocolate, broken into pieces
  • 4-5 oz. dark chocolate (I used Green and Black bars for both. Great success, highly recommended), broken into pieces
  • 1/2 stick butter (four TBS), softened
  • 4 oz. cream cheese (or light cream cheese)
  • 1 tsp. vanilla
Procedure
  • Using the double boiler method (for a how-to, check out the bonus brownie recipe here), melt the chocolates together. Cool for a bit.
  • Stir the butter and cream cheese together until it's all one big mass, then add the vanilla. Mix in the chocolate once it's cooled for 10+ minutes. If the filling seems too liquidy, you can add a bit of milk or more melted chocolate. If it's too chocolaty, you can add more butter.
Raspberry Cream
Ingredients
  • 1-2 TBS heavy cream
  • about 3/4 cup- 1 cup frozen raspberries (if you're using a bag, whatever's left after the cake and the 30 for the top), left to thaw for 10 minutes
Procedure
  • On a large plate, mash the raspberries with a fork. Stir in the cream. The raspberries will still be very lumpy and not very creamy, but this is a good thing.


Chocolate Ganache
Ingredients
  • 1 TBS butter
  • 1/2 cup heavy cream
  • 5 oz. dark chocolate, chopped. This can be a bar or a
Procedure
  • Combine the bream and butter in a small pot and heat gently to just below scalding point (which is where there are little bubbles popping up around the edge and it steams).
  • Place the chocolate in a heat-safe pan (a pie pan works well) and cover with the heated cream. Leave the chocolate to melt for a few minutes, then stir until smooth. If it seems to be not melty enough after several minutes, you can place that pan onto the double boiler and heat briefly.
Assembly!!

Here comes the fun part. I mean this in both the sarcastic and genuine senses-- sarcastic because the assembly is complicated, genuine because it really is quite enjoyable to see it all come together. Again, sorry I don't have more pictures. I'll explain the best I can.

  • First off, you need to cut one of the cake layers in half to form two thin layers. If I had good advice for how best to do this, I'd share it. As it is, I basically did just saw through a layer with my good knife. It crumbled a little but there's enough stuff on each layer to stick it all together again.
  • Place the bottom half off the split layer on a large plate suitable for decorating. Carefully spread a thick layer of the cream cheese filling on top. I found it best to warm the filling briefly so it was a bit more spreadable.
  • Place the top half of the split layer, rounded side down, on top of the filling. Spoon the raspberry cream on top.
  • Place the unsplit layer on top of the raspberry cream.
  • Now, using a knife or a spatula (whichever is easy for you) very carefully spread a thick layer of filling over the top layer, smoothing it as much as possible. Fill in the sides where the layers meet. Again, feel free to warm the filling slightly if it's too difficult to spread on its own. You might not use all of the filling, and the same is true of the ganache.
  • Spoon ganache gently over the filling and use a spatula to smooth the top and sides. Use a spoon or paper towel to mop up the ganache that gathers at the bottom of the plate, especially if it seems in danger of escaping the edges.
  • Dip the reserved raspberries in the remaining ganache and place around the cake. It's important to do this relatively quickly before the ganache hardens.
  • Place the cake in the fridge for at least one hour to set and serve. No ice cream required.


Saturday, May 8, 2010

Babka

Shabbat Shalom! Having just read the title of this post, you are probably either salivating or scratching your head in confusion. If you're among the former, read on! I'm amazed by this recipe. It's AWESOME. If, however, "babka" looks to you like a made-up word, I (Emily) will tell you that it is a yeasted Lithuanian coffee cake. Its basic idea is sorta like a giant cinnamon roll, with a sweet filling in the middle of a sweet roll. But it is so much better than your basic sweet roll. As testament, I will point to the fact that I took the babka out of the oven around 10:30 PM on Thursday. At 8:30 PM on Friday, it was history.

I found this recipe in a great book called A Blessing of Bread: Recipes and Rituals, Memories and Mitzvahs--The Many Rich Traditions of Jewish Bread Baking Around the World. I slightly adapted the recipe for my own use, so I feel no guilt posting this, but I highly recommend the book. It's great for Jews and goyim alike (and if you have no idea what goyim are, that means you're one of them.)

I didn't actually take any pictures of the baking process (sorry!), so the finished product will have to suffice. Also, make this on a day when you have a lot of time around the house, because although there's not a ton of hands-on time, the total process takes 5-7 hours. And don't be intimidated by the length of the recipe; it's really quite simple. It just takes lots of explanation.

Babka
Ingredients (for 1 loaf/roll)
  • 4 TBS butter, softened (half a stick)
  • 3/4 milk (I used 1%, but anything should work. The higher the fat content, the richer the bread)
  • 1 TBS yeast
  • about 2 1/2- 3 cups all-purpose flour (white)
  • 1/2 tsp cinnamon, or 1/2 cinnamon stick, pulverized in a mortar and pestle (I tried this. it took forever, but it was fun, and the flavor was great. The picture's from about halfway through the process).
  • 1/2 cup sugar
  • 1-2 tsp. vanilla
  • 1 1/2 egg yolks (I know this sounds impossible, but since you need an egg glaze for the top it actually works out well. Crack an egg into a bowl and use a utensil, or your fingers, to break the yolk in half. Leave the other half of the yolk, along with the white, in the bowl, and refrigerate 'til needed for the glaze)
  • For the filling, use 1/2 cup sugar, 2 tsp. cinnamon sugar, 3 TBS cocoa powder, 3 TBS butter, and 1/2 cup each raisins and chocolate chips (optional but highly recommended)
Procedure
  • Scald the milk by pouring it into a microwave-safe container and heating on high until it's steaming and little bubbles form around the edges. Let it cool until it's about the temperature of a warm bath.
  • In a large bowl, whisk the yeast and 3/4 cup of the flour together. Once the milk is cool enough, whisk it in 'til it's smooth. Now let it sit for 10-20 minutes. It'll get bubbly and very puffy. (If you're grinding your own cinnamon, this is a good time to do it.)
  • Mix the cinnamon and the sugar together and set aside 2 tsp. for the filling. Whisk the rest, along with the egg yolks and vanilla, into the yeast mix.
  • Add the rest of the flour, along with the butter (I found it easiest to chop the butter up a bit first). Mix 'till incorporated, then turn onto a lightly floured counter to knead (you won't need a lot of flour, most likely). It will be very soft and easy to knead, but keep going until it's smooth and even more elasticky, about 8-10 minutes. For instructions on how to knead, see this post.
  • Place in a clean bowl (which shouldn't need oil, since the bread is so oily), cover with plastic wrap and a towel, and let rise until doubled in volume. This will take 2- 2 1/2 hours, probably.
  • Just before shaping the loaves, make the filling by whisking the sugar, cinnamon sugar, and cocoa together in a medium bowl. Add the melted (and cooled) butter and whisk some more until smooth.
  • There are multiple ways to shape a babka loaf, but all of them involve spreading the filling around the middle of the dough and rolling it up like a carpet. For a loaf that resembles a thick, stout baguette roll the dough out into a rectangle-like shape about 1/4 inch thick. For the pinwheel-like shape I made, roll it into a circle-like shape about 1/8 inch thick.
  • If you're making the rectangle loaf, spread the filling over the whole surface of the dough, leaving a 1/2 inch border around the sides. If you're making the pinwheel, cut the circle in half and spread half of the filling on each piece, leaving the 1/2 inch border. (Whew. That's a lot of halves.) I found it easiest to use my hands for this, but you could try with a spatula. If the filling is too stiff, microwave it very briefly to soften it.
  • Sprinkle the raisins and chocolate chips on top of the filling. You could also add some nuts here, but I'm not a big fan.
  • This is the carpet rolling part. For the rectangle, take one of the long ends and loosely (gently) roll up the dough. For the pinwheel, roll each piece, loosely and gently, like a carpet, starting from the rounded edge and working towards the cut edge. You should have two thick snake-like rolls.
  • Once it's rolled, the dough should be soft enough that you can pinch the edge of the roll into itself, thus sealing it. Use a little water if you need to. Once it's sealed, press your hands lightly along the length of the roll, starting from the center and working towards the end, to eliminate air bubbles. Then pinch the ends together to seal them. Make sure they're tight!
  • For the rectangle, place seam-side down on a greased baking sheet.
  • For the pinwheel, your work is not done. Roll each snake-like piece around so that the middle gets thicker than the ends. The longer you can make these pieces, the prettier the pinwheel, but I didn't try that hard. Bending one piece in half, loop the middle over a chopstick (or something similar). Get a boyfriend (or whoever you happen to have about) to hold the chopstick and starting passing the two ends of the snake over and over each other so twists form. Don't tug the dough too hard! If you only get a few twists (like me) that's ok. Pull the chopstick out of the center and repeat with the other half. Then shape both pieces into "C" shapes. Set one of the pieces into a greased round baking pan and use the other to fill the middle of the first "C" and curve around the outside. If that's confusing, let me know in the comments and I'll try to clarify.
  • Now comes the waiting again. Cover the loaf with plastic wrap and the towel and let it sit for 2 1/2 hours, letting it rise.
  • Before baking, preheat the oven to 300°F and beat the egg you put in the fridge with a pinch of salt. (See, I told you it'd be useful!) Using a pastry brush, or a spatula if you don't have one, glaze the bread with the egg wash. If you don't use it all that's fine.
  • Bake for 50-60 minutes, turning the pan after 40 or so so it browns evenly. When the dough springs back when touched and the crust is a rich golden brown, it's done.
  • Let the loaf cool in the pan/on the tray for 10 minutes, then let finish cooling on a rack as long as you can stand to wait.

Sunday, December 13, 2009

Toffee Triangles

Happy Holidays to one and all! Hanukkah is in full swing (third night coming up-- I have my JCC menorah that I made when I was three, and I found candles at target). You can expect a post on latkes later this week. Also sufgoniyot, but only if I get really ambitious. For now, however, I have a Christmas tradition to share. For those of you going "But I thought you were Jewish," I should point out that my mom is Quaker (and for those of you now going "Well, then you can't be Jewish," we should have a nice little chat.) Anyway, since my mom grew up with Christmas, we've always had a Christmas tree in our house, and on Christmas Eve we sing Christmas carols and have a candlelit tea party with lots of lots of cookies. It's great fun. These particular cookies have been a staple for our tea party since I can remember. I made this particular batch for a Christmas party that I didn't end up going to because we went to see Bozzie's play and got home later than expected (sorry Eric!). But they're still fantastic cookies (and freeze super well). I mean, this is a recipe that I actually follow instead of improvising my way through. Ok, so I may not have measured the flour exactly (sorry Mom).


Toffee Triangles

Ingredients
  • 3/4 cup butter (1 1/2 sticks), softened
  • 3/4 cup brown sugar
  • 1 egg yolk
  • 1 1/2 cups flour
  • 1/4 tsp salt
  • 1 14 oz can sweetened condensed milk (fat free or not--but keep in mind that condensed milk is not the same as evaporated milk)
  • 2 TBS butter
  • 2 tsp. vanilla extract
  • 2 cups chocolate chips or chopped chocolate. These are sweet bars, so I like to use semi-sweet chocolate, but milk would be fine too
  • 1 cup crushed heath bars or other toffee bits (if they're coated in chocolate that's fine)


Procedure
  • Preheat the oven to 350°F
  • Cream the butter and sugar (always an auspicious start--I mean, how can something that starts out like this not be good?)
  • Add in the egg yolk and mix well. For those of you who don't know how to separate eggs, basically what you want to do is crack the egg over a bowl and tip the yolk back and forth from one half of the shell to the other, letting the white drip into the bowl (if you're not saving the white, you can also do this over a sink and save yourself having to clean a bowl).
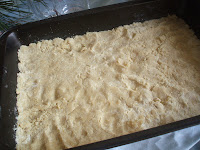
  • Mix in the flour and salt. The dough will be very, very crumbly. When everything's incorporated, tip it into a well-greased 9x13 pan (I prefer the glass ones, but we don't have one here, so metal works too). Pat it down and lick your hands, because they'll taste really good (why yes, of course that's in the original recipe). It should look like this.
  • Bake for about 20 minutes or until the top is golden brown
  • Meanwhile, pour the sweetened condensed milk into a small-medium saucepan and put in the butter. Cook over medium low heat, stirring constantly, until it comes to a low boil. Then keep cooking for 3-5 minutes until it's thick and creamy. This is the most difficult part of the recipe because this stuff burns super, super easily. Like, it'll go from good to charred in seconds. So keep a close watch on it and keep stirring. According to my mom, if brown bits start to come up from the bottom, stop cooking it immediately, pick out the biggest brown pieces, and don't think about it anymore because it'll still taste good.
  • Once the milk has reached the desired consistency, pour in the vanilla and mix it in, then quickly remove from heat.
  • When the cookie layer is done, pour the milk mix on top, using a spatula to spread it around, and bake for 10-12 minutes more, until set and golden.
  • Here's the fun part. As soon as the bars come out of the oven, sprinkle on the chocolate and stick them back in for a minute or two so it melts. Then use a spatula to spread the chocolate (if the chocolate isn't spreadable, stick it back in the oven for a minute until it is. Mmmm.
  • Sprinkle the toffee bits on top and let the whole thing cool for a bit. Looks heavenly, right? The longer you let them cool, the easier they'll be to cut (theoretically). The chocolate will eventually harden, and if you're trying to layer them on a plate like I was yesterday you can stick them in the fridge to quicken this process.
  • When you cut them, I find it easiest to cut squares/rectangles first and then cut each one diagonally to form two triangles. I suppose ultimately there's no reason these must be toffee triangles and not toffee squares, but I like that shape much better (as well as the resulting alliteration). Hey, try it, see what works for you. Dangerously enough, these are just as good right out of the freezer as they are right out of the oven, so if you're trying to do Christmas yummies in moderation (or hide some of the cookies until the candlelit tea party, like my mom does,)the freezer is not an adequate deterrent. Just sayin'....

Tuesday, December 1, 2009

Pumpkin Chocolate Biscotti!


So I don't think it's been mentioned before that both the Ia(i)ns and I are in a mostly-sacred, often-early music vocal ensemble (if we only had an alto we'd have a complete SATB set for our house). We were in choir at Macalester together and had a difficult time thinking of going from 4-5 days a week of singing to none. Plus early music is absolutely gorgeous and ridiculously fun to sing. Last Sunday The Gregorian Singers had an Advent Procession (my first, being, y'know, Jewish), and afterwards we had a potluck party to go to.

I was scrambling for something to make since we'd all just gotten back from Thanksgiving to a mostly-devoid-of-groceries house when I suddenly remembered the 128 Cookie Recipe magazine my mom bought me for airport reading. Flipping through it, I spotted a few biscotti recipes that looked fun, but I didn't have all the ingredients for any of them. I was also in the position of having a half can of pumpkin in my fridge. While easy and tempting enough to make more pumpkin bread, I figured it'd be more interesting to try something new. Thus, a baking adventure seemed prudent. This was only my second attempt at biscotti of any sort, but I think they actually went well! And they're a very different deal than the chocolate chip pumpkin bread, regardless of the similarities in recipe form.


Ingredients
  • 1/4 c. butter (half a stick- you could go up to 6 TBS)softened
  • 3/4 cup sugar
  • 2 eggs
  • about 1/2 cup pureed pumpkin
  • 1 tsp. vanilla
  • 1 1/2 tsp. baking powder
  • 1 1/2 tsp cinnamon
  • 1/2 tsp. ginger
  • 1/4 tsp cloves
  • 1/4 tsp nutmeg
  • dash of salt
  • 3 cups flour
  • about 2/3 chocolate chips or chopped dark or semi-sweet chocolate (I actually chopped the chocolate chips a bit so they'd get better incorporated).
Procedure

Now, just as a disclaimer, there are a lot of ideas of what makes a biscotti truly a biscotti. I don't really know any of them. All I know is that biscotti must be twice baked. Also, this is a baking adventure; measurements are approximate.
  • Preheat the oven to 375°F.
  • Combine pumpkin and butter in a large bowl and mix well. There will be some lumps. Don't worry too much about those, but don't leave huge chunks of butter.
  • Add the sugar and baking powder and salt, then the eggs and vanilla, then the spices.
  • Stir in the flour. A mixer would make this easier, but you can do it! It will make a stiff dough. Throw the chocolate in and incorporate it as best you can.
  • Dump the dough onto a lightly floured surface and split it into two. Make two logs out of it like the one in the picture. They should be about 8"-12" long. Just pat the dough into place-- it should stick pretty easily, since it's so stiff.
  • Stick the rolls on a baking sheet (ungreased) and pop them in the oven for about 20-25 minutes or until a toothpick comes out clean.
  • Cool for awhile and then cut the logs very carefully, in a sawing motion with a serrated knife into slices. Mine were 1/4-1/2 inch thick. If your logs are like mine, some of the pieces will crumble a bit, but that's ok.
  • Place the slices on a baking sheet like the one above, reset the oven to 325°F, and bake for 10 minutes. Then flip and bake about 10 minutes more. Actually, they'd probably be fine if you didn't flip them, but I did. If they come out a little soft in the middle don't worry. They'll crisp up while cooling.
I recommend dunking in tea or cocoa.

Saturday, November 21, 2009

Chocolate Chip Pumpkin Bread!

Happy Weekend to all!

Weekends are a really precious commodity here in the realm of AmeriCorps employment. I'm so busy trying to get my hours during the week that, even if I (Emily) have time to cook or bake elaborately, I don't often have time to blog about it. But on a Saturday I have time to bake and blog and it's lovely.

This is a recipe I associate exclusively with autumn. I don't remember when my mom first started making it, but I was pretty young. When I acquired my own kitchen last fall, I asked her for the recipe and found, to my delight, that it was not her creation but my favorite preschool teacher's. I was a rather hyper child, but Harriet at the Richmond JCC totally understood me. She'd get me to follow her around on errands and stuff. My three-year-old memory has nothing but fond associations with her. And I don't think she'd mind me sharing this recipe with the world. So, without further adieu....


Harriet's Chocolate Chip Pumpkin Bread

Ingredients
Note: I am giving all of these for a one-loaf batch, but the recipe my mom gave me actually makes two, so feel free to double this. I just don't want to take up more freezer space, so I made one loaf. It freezes beautifully though.
  • 2 eggs
  • 1 cup of white sugar
  • 1/2 cup oil
  • 3 TBS water
  • 1 cup pumpkin puree (I am lazy and use the canned stuff, but I'm sure if you use your own it'd be even better!)
  • 1 3/4 cups flour (part whole wheat ok)
  • 1 tsp. baking soda
  • 3/4 tsp. salt
  • 1 tsp. ground cinnamon
  • 3/4 tsp ground ginger
  • 1/4 tsp. cloves
  • a dash of nutmeg
  • about 1/2-1 cups chocolate chips (or mini chocolate chips)
You can also make this bread without the chocolate chips. Increase the spices and add 1/3 cup raisins and 1/2 cup walnuts, if you like.


Procedure
  • Preheat the oven to about 300°F to 325°F. My oven's a bit wonky and I found 300 to be too low. More on this later.
  • Beat the eggs and sugar together and add the oil, water, and pumpkin puree. Your mixture should look wonderfully orange.
  • Again, it says to mix all the dry ingredients separately, but I just throw them in with the wets. Either way, mix everything together. Taste a bit and add more spices if that seems wise.
  • Stir in the chocolate chips. The batter should be thick at this point.
  • Pour into a greased loaf pan and bake for about 1 1/4 hours, until a knife comes out mostly clean. The chocolate chips will obviously get all over it. As I said, this is where it gets complicated. I found 1 1/4 hours on 300°F to be far from sufficient and ended up turning it up to 375°F or so. But experiment. I certainly wouldn't put it over 375, but it might be better to start it around 325 or 350, depending on the strength of your oven. These can also be made as muffins. One loaf should equal 12-18 muffins, depending how big you make them. Bake for 20-25 minutes.
  • Let cool on a wire rack. Or, if you're like me, cut into it right away and get crumbs everywhere. It might turn out crumbly. That's ok. It still tastes awesome. Enjoy! And I highly recommend milk.