Good evening, dear readers! I would like to update you on the happenings in our kitchen over the past week. Last Saturday, my beautiful girlfriend Alberta came over and I cooked a Thai meal for four. I used Iain's The Food and Cooking of Thailand by Judy Bastyra and Becky Johnson, which Iain got, weirdly enough, in a white elephant gift swap. Weird because it's an awesome cookbook. How lucky we are! This cookbook has a lot of cultural notes in the beginning and talks extensively about the ingredients and preparation. The recipes themselves are pretty straightforward, presented with large, colorful pictures. Unfortunately, they are in weighted measurements, which is pretty obnoxious to this Yankee chef who has no scale in his kitchen. But we approximated well enough and it worked out splendidly.
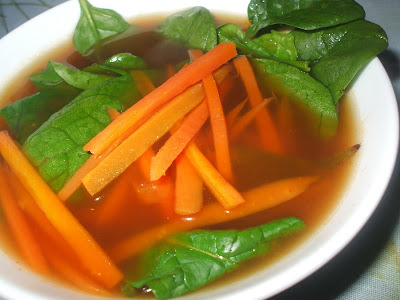
The first course was a Hot and Sweet Vegetable and Tofu Soup:
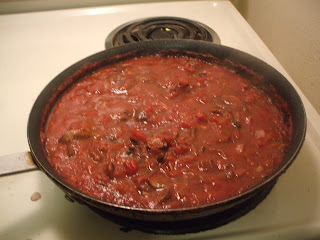
The next one got a little more interesting. I made Noodles and Vegetables in Coconut Sauce, and just eyeballing the recipe, it seemed that it wouldn't make enough for us. So I came to the co-op intending to quadrouple it. Then, looking at the veggies, I thought that doubling it would be about enough. Little did I know........
Yikes!! As I was adding the coconut milk, someone asked me if it was really 4 cans that I was putting in, and mentioned that that would mean one can of coconut milk, per person, as well as about 2 zucchinis per person. But I was proud and it still tasted good. Heh. Just a fun learning experience!!
Here's Emily with the expression we all shared as we realized this together. We were all laughing so hard:
The next day, Iain and Emily cooked a mighty Southwestern brunch, which I'll let them fill you in on. My only postscript will be a photograph of my chicken stock sitting in my freezer. I made some more from the carcass of a small, sustainably & ethically raised chicken from a farm that had to close down because of the recession. I had roasted the chicken for a feast and saved the bones to make some yummy stock with leftover veggie choppings (skins, stems, roots etc.). All three of these containers are full of chicky broth:
Yeah!! From chickens!!!!!!!
Friday, January 29, 2010
Saturday, January 23, 2010
Mushroom-Parsley-Thyme Risotto
Ok, so I hadn't planned on posting this, because I figured, "hey, it's hard to mess up risotto," but during dinner last night Bozzie told me this was special risotto and Iain said it was the best risotto he'd ever had. Take those comments with a grain of salt, if you will, but they were enough to get me to write up the recipe. However, since I wasn't planning on posting, I only have a picture of the finished product. Oh well.
Just as a note, risotto is a simple enough process, but it does involve a lot of hands-on cooking, so if you're having an evening where you need food you can stick on the stove and leave alone for awhile, don't make this. That being said, it's some of the best comfort food in the world.
Mushroom-Parsley-Thyme Risotto
Ingredients- lots of mushrooms, sliced thinly. We used perhaps 1/2 a pound of baby chanterelles, but if you have other kinds or if you have wild mushrooms, so much the better. If you like, you can also rehydrate some dried mushrooms and use the mushroom water in addition to your broth.
- a generous glug of lemon juice
- a generous handful of parsley, chopped
- 1 onion, chopped small
- 1 clove of garlic, minced
- about 6 TBS butter, plus 2 TBS olive oil
- 1 1/2 cups arborio rice (the kind used for risotto--you could try subbing another, cheaper kind but I don't think it'd work well).
- a few glugs of a white wine (about 1/2 cup. we used a Three Buck Chuck chardonnay to great success.)
- a generous pinch or two of dried thyme. I'm sure fresh would be lovely too, but we didn't have any.
- Lots of broth/water (broth is better). You're gonna want to plan on at least 3 cups, but it could be closer to 4. It all depends on the rice. Lots of recipes recommend heating the broth before using it, but I didn't, so take your pick.
- garlic powder to taste, probably a teaspoon or two.
- salt and pepper to taste
- parmesan cheese. Use at least a few TBS in the pot, and then add more to individual servings
- Put the sliced mushrooms into a bowl with the lemon juice and toss a bit. Meanwhile, melt 2 TBS of the butter in a large pot. Cook the mushrooms over medium for a few minutes, until they release their liquids and brown somewhat. Stir in the parsley and half of the garlic and cook for a few seconds more--maybe a minute. Put the mushrooms et al. into a bowl and set aside.
- Melt another 2 TBS butter, as well as the olive oil, in the same pot. Cook the onion and the rest of the garlic over medium until it's soft and golden, then add the rice. Stir it around for a couple minutes, frying it. Add the mushrooms and mix them all around. You can also add the thyme at this point; I added little pinches a couple times throughout the recipe process.
- Pour in the wine. It'll smell awesome. Let it evaporate over medium heat.
- This is the labor-intensive part. Add a small ladleful of the broth--maybe 1/4-1/3 cup. Then start stirring. You want to keep the rice from sticking to the bottom of the pan, so it's necessary to stir a lot. Wait until the rice has absorbed the water, then add another ladleful. Continue to do this for awhile--probably at least 15 minutes. Then taste the rice to see how close it is to being soft. You can also start adding garlic powder, salt, and pepper. Depending on your rice, you might need from 20-40 minutes of overall broth adding/stirring time. I like my rice a tiny bit on the chewy side, so mine was done about on the 30 minute mark.
- Once the rice is done and seasoned to your satisfaction, remove it from the heat and stir in the remaining butter (optional-- but it tastes better) and some parmesan.
- Serve hot, topping with more cheese.
Friday, January 22, 2010
White Bean Corn Tacos
This is a dish inspired by the kitchen staff at the Cheeky Monkey, who are great people and who feed me occasionally as I am mopping the floor before the deli opens. One morning I was given a plate with a few little corn tortillas with some kind of yummy white bean filling. Mm! Muchas gracias. A few days ago during Gregorian Singers rehearsal I was thinking about what I could cook for dinner and these popped into my head - it would conveniently deplete my stock of fridgey stuff and have it all come together in a delicious synergy. Now my fridge is empty, but my belly full.
White Bean Corn Tacos
(makes 4-5 little tacos, enough for a couple people)
Ingredients:
2. Add the zucchini and cook it just a few minutes, tasting it to make sure you don't overcook it. Scoop out the avocado now and add it, too, squishing it around to mix it in. Oh, put in the white beans now, too, and be careful not to break them with your wooden spoon.
3. When the zucchini's almost cooked, add in the cheese, cilantro, and lime. Stir it around, melt the cheese, then when the cheese is melted and the zucchini cooked and the spices adjusted you can turn off the heat and break the egg over the pan and stir rapidly to get it mixed in around everywhere. Yummmmmmmy.
4. Here is where you take a smaller frying pan and your little tortillas and a little splash of veggie oil and heat them over medium heat, half-filled with mixture, like so:
Spoon on the mix and then close the tortilla into a taco shell so it's pretty and easily edible, like so:
Cook it just a minute or two, until the corn tortilla is hot and a little crispy. That's it! Enjoy! If you have leftovers, sprinkle some Parmesan over them before you put them in the microwave. It looks quite lovely.
White Bean Corn Tacos
(makes 4-5 little tacos, enough for a couple people)
Ingredients:
- Little corn tortillas
- Vegetable oil
- An egg
- An avocado
- A small zucchini
- 2-4 cloves garlic, minced
- An onion, chopped
- 1/4 of a lime
- White beans - not too many - 1/8 of a can, perhaps, is what I had left over in my fridge
- 2 Tablespoons or so of Parmesan
- 2 Tablespoons or so of raw-milk cheddar or other variety of cheese you might have in your fridge
- Cilantro, enough to garnish
- A dash of chili powder
- A dash of cumin
- 1 teaspoon black pepper
- Common Tones in Simple Time by John Adams
- Symphony No. 5 by Sibelius
2. Add the zucchini and cook it just a few minutes, tasting it to make sure you don't overcook it. Scoop out the avocado now and add it, too, squishing it around to mix it in. Oh, put in the white beans now, too, and be careful not to break them with your wooden spoon.
3. When the zucchini's almost cooked, add in the cheese, cilantro, and lime. Stir it around, melt the cheese, then when the cheese is melted and the zucchini cooked and the spices adjusted you can turn off the heat and break the egg over the pan and stir rapidly to get it mixed in around everywhere. Yummmmmmmy.
4. Here is where you take a smaller frying pan and your little tortillas and a little splash of veggie oil and heat them over medium heat, half-filled with mixture, like so:
Spoon on the mix and then close the tortilla into a taco shell so it's pretty and easily edible, like so:
Cook it just a minute or two, until the corn tortilla is hot and a little crispy. That's it! Enjoy! If you have leftovers, sprinkle some Parmesan over them before you put them in the microwave. It looks quite lovely.
Wednesday, January 20, 2010
Calabacitas and Griddle Cakes
Being not Pueblo myself, nor having had the pleasure of meeting any Pueblo people, I can only assume that what I have prepared tonight is Pueblo food. At the very least, it was inspired by their cooking. I'm writing a story which features Pueblo cultures and I wanted to keep the ball rolling on our house's cook-from-your-fantasy-world theme. So here is Iain holding a plate of my approximate Pueblo meal, Calabacitas and Griddle Cakes:
But that one's a little fuzzy, so here's a close-up:
Calabacitas
From Mollie Katzen's Sunlight Cafe
Ingredients:
1 Tablespoon olive oil
1 cup minced onion
1 cup minced anaheim and/or poblano chiles (I used a jar of piquillo peppers)
1/2 tsp salt
1-2 tsp chile powder
2 cups diced zucchini (about two 6" zucchini)
2 cups corn kernels
2 tsp minced garlic
3/4 cup cooked pinto beans (half a 15oz can)
grated cheese
pepper
lime wedges (we didn't have a lime so I just dabbed in some lemon juice)
1. Heat a medium skillet on medium heat with the oil. Add onion, chiles, salt, and chile powder. Cook this for 8-10 minutes, stirring frequently, or until the veggies are soft.
2. Add zucchini, corn, garlic, and beans. Cook this - stirring gently to keep the beans in tact - for 5 more minutes, or until the zucchini is just tender. Mollie cautions us not to overcook the zucchini. Take the pan off the heat once the zucchini is done to your liking.
3. Sprinkle in cheese, add pepper and salt, and citrus. You are now ready to serve this.
Hopefully in the meanwhile, you have been making some
Griddle Cakes
from this site
Ingredients:
2/3 cup flour
1 tsp baking powder
1/2 tsp salt
2 tsp sugar
1 tsp finely minced onion
1 12oz can corn, drained
2 eggs, beaten
1/4 cup melted butter
1/2 cup milk
1. Combine dry ingredients, mix the wet ones together then mix them into the dry stuff. But you could probably just mix it all together in one bowl. Then in a large skillet or a griddle, heated up to medium or medium-high, drop small spoonfuls of this mixture and let it cook until it is nicely colored and reasonably solid on the inside, like so:
2. There is only one step.
This is what your kitchen should look like:
Brilliant! Enjoy!
But that one's a little fuzzy, so here's a close-up:
Calabacitas
From Mollie Katzen's Sunlight Cafe
Ingredients:
1 Tablespoon olive oil
1 cup minced onion
1 cup minced anaheim and/or poblano chiles (I used a jar of piquillo peppers)
1/2 tsp salt
1-2 tsp chile powder
2 cups diced zucchini (about two 6" zucchini)
2 cups corn kernels
2 tsp minced garlic
3/4 cup cooked pinto beans (half a 15oz can)
grated cheese
pepper
lime wedges (we didn't have a lime so I just dabbed in some lemon juice)
1. Heat a medium skillet on medium heat with the oil. Add onion, chiles, salt, and chile powder. Cook this for 8-10 minutes, stirring frequently, or until the veggies are soft.
Cough, cough - you're seeing the corn and zucchini in this shot. It's because I didn't read ahead and mixed everything all together at the beginning and had to separate it out and yeah.
2. Add zucchini, corn, garlic, and beans. Cook this - stirring gently to keep the beans in tact - for 5 more minutes, or until the zucchini is just tender. Mollie cautions us not to overcook the zucchini. Take the pan off the heat once the zucchini is done to your liking.
3. Sprinkle in cheese, add pepper and salt, and citrus. You are now ready to serve this.
Hopefully in the meanwhile, you have been making some
Griddle Cakes
from this site
Ingredients:
2/3 cup flour
1 tsp baking powder
1/2 tsp salt
2 tsp sugar
1 tsp finely minced onion
1 12oz can corn, drained
2 eggs, beaten
1/4 cup melted butter
1/2 cup milk
1. Combine dry ingredients, mix the wet ones together then mix them into the dry stuff. But you could probably just mix it all together in one bowl. Then in a large skillet or a griddle, heated up to medium or medium-high, drop small spoonfuls of this mixture and let it cook until it is nicely colored and reasonably solid on the inside, like so:
2. There is only one step.
This is what your kitchen should look like:
Brilliant! Enjoy!
Monday, January 18, 2010
Yin-Yang Pasta: Red and White Wine Sauces
Howdy, and a happy MLK day to all! (I attempted to contrive some sort of segue from that into talking about the food, but it sounded too stupid to even come off as ironic, so I say again unto you, happy MLK day, and I'll leave it at that!)
Today I bring to you two twin recipes, born of the same stock (that is, my brain), which shall... I entirely forgot where I was going with that sentence. In fact, almost everything I've tried to type in the way of an introduction I've just deleted immediately afterward. The little people managing my brain would like to apologize for the lack of coherence, and assure you my ability to communicate will be restored shortly.
In the meantime, here are the recipes.
Red and White Wine Pasta Sauces
Ingredients:
Both:
1 lb pasta (I used mostaccioli for the red and lemon pepper papardelle for the white)
olive oil
1/2 an onion, diced (I used red for the red and white for the white :) )
10-15 mushrooms, sliced
4 cloves garlic, minced
salt
pepper
basil and oregano
Red:
1/3 cup red wine of your choice
1 28 ounce can of crushed tomatoes
1 healthy glug of balsamic vinegar
White:
1/3 cup white wine of your choice
1/4 cup olive oil
1 green pepper, diced
1 large tomato, diced
Music Listened To:
I don't actually remember what it was, but there is indeed a strong chance that it was my new Liz Carroll album entitled... Liz Carroll! On a side note, I have recently met the guitarist on that album, Dáithí Sproule over at the Session at Merlin's Rest, which was rather exciting. But, I digress...
Procedure:
1. Prepare the mushrooms: heat some olive oil in a skillet over high heat. You know, all of us have a different method of testing to see when the oil is ready. Emily's method involves putting in a little bit of the garlic and waiting for it to sizzle. Mine involves flicking water onto the oil and seeing if you hear a pop and sizzle. Bozzie's involves... I'm rambling again, aren't I?
When the oil is ready, add the mushrooms and begin sauteing over high heat. Add about a clove of the garlic, a pinch of basil and oregano and, lastly, a splash of the wine. Heat until the mushrooms drink up some of the wine. Set aside.
2. Do them onions: Heat some more olive oil in the skillet. You know, all of us have a different... (kidding!) Saute the onions over low heat. Be patient - the best results come if they are cooked slowly. If you're doing the red wine sauce, go for about 5 minutes. If white, more like 10, since you're aiming for a generally sweeter taste. Gesture dramatically as the aromas arise.
3. Combine stuff: Add the remaining garlic and wine. For the red wine sauce, dump in the tomatoes, bring to a boil, turn down to a simmer and add the vinegar and other seasonings. For the white, add the remaining olive oil and seasonings and similarly get simmering. Nice slow cooking. Oh yeah, if you haven't already, boil the pasta. Generally you want your sauce simmering about the same amount of time you have the pasta boiling.
4. About 3-5 minutes from the end, add the tomato and green pepper if you're making the white wine sauce. Stir the sauce constantly either way. This is a good time to taste and adjust the flavors as desired. I cannot argue with adding more garlic if not garlicky enough or adding more vinegar if the red sauce isn't tangy enough.
And that's pretty much it. Add to the pasta and serve with a glass of wine! My housemates gobbled these up, and the smell is pretty great while its cooking. I'd have to say my personal preference is for the red wine sauce due to the complexity of flavor you get from the red wine, but both are definitely quality Yummies. My rambliness seems to have calmed down for the time being, although a bit too late for you all. Sorry!
Labels:
garlic,
onions,
pasta,
red wine,
vegetarian,
white wine
Wednesday, January 13, 2010
Foccacia!
Ok, so call me a blog hog, but the boys are being lazy and I have ambition to post. It's winter, and winter is major bread-baking season for me.
This particular baking adventure of sorts came up last weekend when I watered my little rosemary plant in the living room and the smell made me smile. Plus, since my little rosemary plant was getting sorta big, I wanted to prune it. I added the caramelized onion topping purely because we had leftover caramelized onions from another meal; you are in no way obligated to caramelize onions specifically for this bread.
Focccacia is sometimes referred to as a flatbread, but I don't see it that way. There's yeast in it, and it puffs up significantly by the time it's done. It's awesome plain, dipped in olive oil, or sliced in half to serve as sandwich bread. This recipe came originally from the Rebar Cookbook, but I've altered it to suit my purposes (namely, a bag of whole wheat flour close to expiration and a consequent effort to deplete it).
Two-Topping Whole Wheat Foccacia
Ingredients
Procedure
- 1 3/4 cups wrist-temperature water
- 1 TBS yeast
- 1/2 tsp. sugar
- 1/4 cup olive oil
- 2 1/2 cups white flour
- 1 1/2 cups whole wheat flour (note: you could try using more whole wheat flour/less white, but for a light bread like foccacia I preferred to stick with mostly white)
- olive oil to drizzle over the top
- 5 minced garlic cloves
- 2-3 TBS minced fresh rosemary (you could use dried, but fresh is better)
- salt (I used sea salt-- a coarser one like rock or kosher would probably be better)
- black pepper
- 1/4 cup caramelized onion
- 1/4 cup feta cheese crumbles
Procedure
- Put the water into a large mixing bowl and sprinkle the yeast and sugar in. Let it sit until fragrant and foamy, about 5 minutes.
- Mix in the salt and olive oil.
- Add flour one cup at a time (I alternated white and wheat). If the dough gets too stiff to mix in the bowl, don't worry about it. Just dump it onto a floured counter and start the kneading process.
- Knead for 8-10 minutes, until the dough is smooth and elastic. Clean out the bowl of any clinging bits of flour and coat it with a thin layer of olive oil.
- Dump the kneaded dough into the oiled bowl, roll the dough so all surface gets oiled, and let it rise, covered, for 1- 1 1/2 hours, until it's about doubled in size.
- Punch the dough down and let it rise until it doubles again (this should take less time than the first rise). This is a good time to mince your garlic and rosemary.
- Pre-heat the oven to 350°F and oil a cookie sheet (preferably one with short sides-- but we're not talking a brownie pan here). Dump the dough onto the sheet and coax it outward to meet the edges of the sheet.
- Toppings! Drizzle olive oil generously (or not-so-generously, depending on your preference) over the surface of the bread, and follow it with some salt and pepper. This is where the foccacia splits, if you're choosing to follow the two-flavor recipe. Sprinkle the garlic and rosemary on 2/3 of the foccacia and the onion and feta on the other 1/3. (Obviously you could do it half and half too-- I just had appropriate proportions for 2/3-1/3).
- Use your fingertips to poke little dents all over the bread and let it rise for about 15 minutes.
- Bake for 20-30 minutes or until the bread is puffy and the garlic is golden.
Tuesday, January 5, 2010
Greek-Stuffed Eggplant
So this dish came strictly from necessity; I had an eggplant in my possession the night before returning to Georgia for Christmas and knew that it wasn't going to last the break. I decided to bake it, thinking that it'd be easy enough to make it into eggplant pasta or something, but then I realized that I had half a red onion and some feta too and started just kinda experimenting. The results were far superior to what I'd anticipated. Amounts are approximate, and I'm sure this could be easily doubled.
Ingredients
Procedure
Greek-Stuffed Eggplant
Ingredients
- 1 medium eggplant(or any size, really), sliced in half lengthways and salted(if you don't know how to salt an eggplant, see my post on eggplant pasta from the summer)
- A few TBS olive oil
- 1/2 red onion, sliced thinly
- a generous slosh of lemon juice
- 2-4 TBS tahini (which can be easily home-made, it turns out!!)
- 1 huge clove garlic (or a couple little ones)
- 2 tsp dried oregano
- 1-2 handfuls of parsley, chopped or ripped into little bits
- 1/4-1/3 cup feta cheese crumbles
- salt and black pepper to taste
Procedure
- Heat the oven to 400°F
- Put the salted eggplant onto a well-oiled baking sheet and coat both sides in more oil. You don't have to go overboard, but make sure the eggplant doesn't stay dry. Bake the eggplant until it's brown and slightly crispy on the edges-- 30-45 minutes. You'll probably want to flip the eggplant once.
- Heat olive oil in a skillet and saute the onion and oregano over medium heat until they're soft. The slower you do this, the better it'll probably taste. (This was the point in my evening when I was going "Oh geez, I have a lot of stuff to use up. Umm...let's get this side dish going and figure out what to do with the eggplant when it's done," so I was stalling for time a bit). Add the garlic, lemon juice, and parsley, and stir in the tahini.
- Once the eggplant comes out of the oven, wait a minute for it to be cool enough to handle, and then scoop out the innards. Do this carefully, so you don't go right through the skin. I used a spoon to get out most of it, then pulled out the rest with a butter knife, but whatever works for you. Throw the pulp into the skillet with everything else and mix it in well, chopping it into smaller pieces with a spoon.
- When everything's nicely incorporated, and you've thrown in some salt and pepper and whatever other seasonings you like to taste, scoop the whole mix back into the eggplant shells. Sprinkle the tops with the feta crumbles and more tahini (if you like) and then let it bake at 350°F for about 10-15 minutes, then broil for 2-3 minutes more (broiling is scary, so watch it carefully or it'll burn!)
- I ate mine just as it was, but I'm sure a spinach salad with kalamata olives would have made it even better.
Subscribe to:
Posts (Atom)